
Congratulations on the purchase of your new Bullfrog Spas Swim Spa! Please review the following article to ensure you are adequately prepared for the delivery and installation of your new spa. In this article we will review the requirements for power, and discuss the clearance requirements for the patio, and surrounding areas.

Choosing a location
When choosing a location for your new swim spa, there are four major things to consider.
- Cover clearance
- Stair Clearance
- Pad Size
- Equipment Access
In addition to providing adequate clearances surrounding the spa, it is also recommended that you choose a location within close proximity to the entry of your home. A shorter walk means less possibility of debris being tracked into the water. And during the colder months the less steps you have to take through the snow the better!
1. Cover Clearance
When choosing the location and orientation of your spa, one of the most important factors to consider is how the orientation of the spa’s cover will interact with your patio. The Swim Series Swim Spas comes with two separate covers that split in the middle. Each cover folds in half and hangs on the skinny ends of the spa—creating a privacy wall.
Closed position
This is what the covers look like when they are closed.

Open position
This is what the covers look like when they are opened. Note how they create a privacy wall on each of the short ends of the spa. Consider this when choosing the orientation of your spa

Minimum Clearance
As the cover lifters open, they will pivot the cover away from the spa momentarily as it moves into the upright position. Measure this dimension against shrubbery, rock walls, or simply the exterior of your home.
| Minimum Clearance | 10” |

2. Stair Clearance
One component of the swim spa kit that is commonly overlooked during the planning phase is the placement of the stairs. Keep in mind that the S150 and S200 have an overall height of 52”. To comfortably access the swim spa, we recommend purchasing a stair with at 4 steps. While there are several options available, the Swim Step is color-matched to the Swim Series exterior and provides a cohesive finished product.
4-Step Stair Dimensions
| Swim Step | 58″ x 34.5″ x 61.5″ |
| ModStep 4 | 58″ x 34.5″ x 61.5″ |

3. Spa Pad
Now that we’ve established the clearance required for the accessories that surround the swim spa, you can make a final decision on the location and orientation of the spa and the spa’s foundation.
General Guidelines:
If your spa’s base is slightly sloped it may not affect the performance of the spa or its structure, however, there should be no dips, sags, or unevenness in the base beneath the spa. Most patios are built to slope away from the house for drainage purposes. There should be no more than a 1/2” (1cm) slope in an 8 ft (2m) run. A concrete pad of adequate thickness to support the filled weight of the spa is recommended for a base. A reinforced deck engineered specifically to exceed the maximum filled weight and adhering to any local, regional, or national building codes that may apply is also a possibility.
Material
Select a structurally sound flat surface that is reasonably level to serve as your spa’s foundation. A foundation that shifts or settles may cause stress to the spa shell. The foundation that your spa rests on must have a weight bearing load capability of supporting the weight of your spa, its water, and the people using it. The maximum filled weight of a spa can be as much as 20,000 lbs. (9,072kg), plus the weight of the occupants that use the spa.
| Pad weight capacity | > 20,000lbs |
| Recommended Material | Reinforced Concrete |
| Recommended Thickness | 4” |
If your spa’s base is slightly sloped it may not affect the performance of the spa or its structure, however, there should be no dips, sags, or unevenness in the base beneath the spa. Most patios are built to slope away from the house for drainage purposes. There should be no more than a 1/2” (1cm) slope in an 8 ft (2m) run. A concrete pad of adequate thickness to support the filled weight of the spa is recommended for a base. A reinforced deck engineered specifically to exceed the maximum filled weight and adhering to any local, regional, or national building codes that may apply is also a possibility.
Dimensions
If you are building a custom surround for your swim spa you can simply pour a pad large enough to bear the weight of the unit. However, in most scenarios we recommend you pour an oversized pad to accommodate for space to hold the stairs, and provide a path to walk around the exterior of the swim spa.
| Minimum S150 Pad Size | 8’ x 13’ |
| Recommended S150 Pad Size | 14’ x 16’ |
| Minimum S200 Pad Size | 8’ x 17’ |
| Recommended S200 Pad Size | 14’ x 19’ |

4. Equipment Access
The last consideration to make when selecting a location is the space required for a technician to access and service the swim spa. All of the serviceable equipment is contained on the end of the spa with the hot-tub-style seats. When possible, leave enough space for the end panels to be removed to reveal the pumps and electronics.
Access Dimensions
To provide adequate access to the serviceable components, it is recommended to leave a 3’ clear-space around the side and end panels closest to the spa’s touch-screen controller.

Electrical
Your new swim spa requires a dedicated 220v supply line. Bullfrog Spas of Northern Utah provides no electrical services. All electrical supply must be completely installed prior to the installation date.
| Voltage | 220V |
| Amperage – S150 | 50A |
| Amperage – S200 | 60A |
| Conduit | ¾” Flexible (non-metallic) |
| Wire Gauge | Determined by electrician |
| Length | Determined by electrician |
Spa Disconnect Box
The S150 requires a 50A GFCI disconnect, the S200 requires a 60A GFCI disconnect. This box should be within sight of the spa, but not closer than 6’. Electrical requires this distance so that it is impossible to touch the power supply and the unit simultaneously.

Electrical Whip
The electrical whip is a term used to describe the portion of the electrical assembly that connects the spa to the GFCI breaker. The Whip consists of
- Wire (Two hots, One neutral, one Ground)
- ¾” Non-metallic flexible conduit
- A straight fitting
To determine the length of the whip required for your spa measure the distance from the disconnect box to the end of the spa with the touch screen and then add 6 feet.

Optional Stub Up
If you are pouring a new concrete pad for your swim spa. You have the option to “Stub-up” your electrical conduit through the concrete, and directly into the bottom of the spa. However, when placing the conduit It is critical that it is positioned such that it will not interfere with any equipment on the inside of the spa. Use the following diagram to identify the location of your conduit stub up.

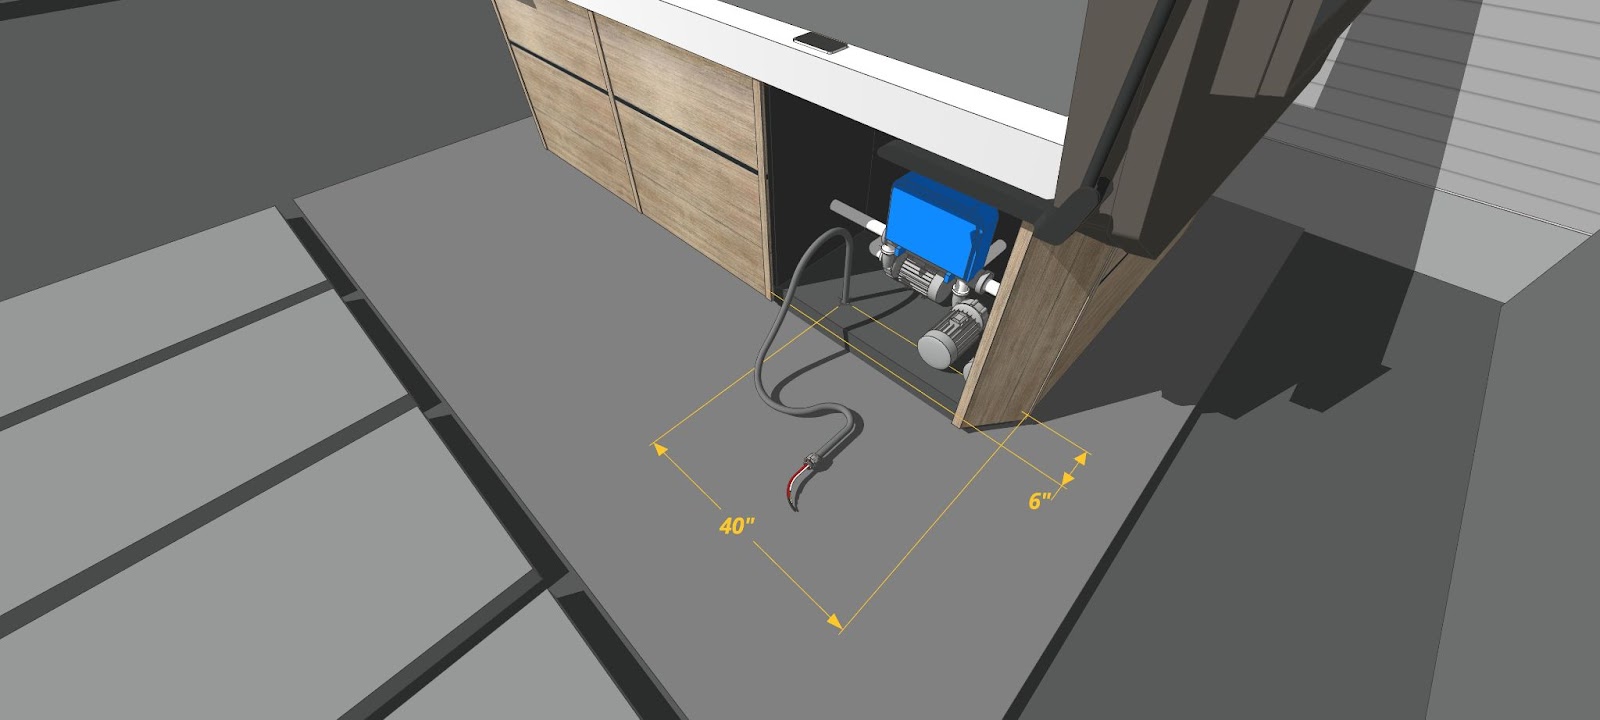
Contractors Diagram
Click on the corresponding PDF below to view the location of the chaseway on your spa model.
Delivery
Unlike hot tubs, swim spas can not be tipped on their side for delivery. This leaves three options for delivery; Tilt Trailer, Boom Truck, or a Large Crane.
Option 1: Tilt Trailer Delivery

Option 2: Boom Truck Delivery

Option 3: Large Crane Delivery

Delivery Option Price Expectations:
- Tilt Trailer Delivery: $$
- Boom Truck Delivery: $$$
- Large Crane Delivery: $$$$$
Although the cost of additional equipment is not included with the purchase of your spa, Bullfrog Spas of Northern Utah will happily coordinate with third party providers on your behalf if a Boom Truck or Large Crane delivery is required to install your swim spa. Here’s how it works: